UMN HEP Cluster
A computing cluster for the UMN HEP research groups (mainly CMS).
This manual is meant to be a helpful guide for users of this cluster, and be notes for the administrators documenting why certain design choices were made.
General Comments
This cluster is roughly 140 machines. These machines are (on average) a decade old, so we chose to keep the design simple and modular in order to allow the cluster as a whole last longer as the individual components die (and we wait for potentially more funding to upgrade components).
Simplification of the cluster led to the decision to decomission HDFS (a distributed filesystem). This decision is supported by studying the behavior of using a NFS-mounted ZFS storage node already existing (whybee1) as the main storage for our cluster computing. This study showed that copying files to a scratch space, processing them, and then copying the output files to the storage area was satisfiably performant.
Many different folks require many different libraries and some of those libraries conflict with each other and cannot even be installed on the same machine. For this reason, we are standardizing the usage of containers for compiling and running all software. CMS has put shared a set of helpful containers on CVMFS, so CMS folks can use it from there.
Launching the development environment looks like the following
source /cvmfs/cms.cern.ch/cmsset_default.sh
export SINGULARITY_BIND=/home/,/local/cms/user/,/export/scratch/
cmssw-cc7 --ignore-mount /cvmfs/grid.cern.ch/etc/grid-security,/cvmfs/grid.cern.ch/etc/grid-security/vomses
Then you can run your normal compiling/running commands from within this container.
Note: Your favorite text editor may not be available within the container, so you may want a separate window for file editing. Having two windows open side-by-side can be done with tmux.
New Cluster User
We always forget how to get new users started because we only ever have to do it once.
This page has manual notes on the process as of Fall 2022. The time is important because the start-up process may change if the cluster backend changes.
0. Get a UMN Internet Account
For UMN students (grad or undergrad), this is automatic. For summer students, this may take a few days of paperwork.
Test: You have a UMN email and/or a UMN student ID.
1. Activate SPA Computing Account
Email csehelp@umn.edu and ask them to activiate your SPA computing account.
Provide the following information in your email:
- Which professor is your advisor (they may want to double-check with that person if they can't find your name in their system)
- That you would like a SPA computing account and have access to the "SPA OSG cluster" (that's their name for this cluster).
I belive this second substep amounts to adding you to the
SPA-hepcmsActive Directory group.
Test: You can SSH to the general-access node with your UMN credentials.
ssh <username>@spa-ssh-01.spa.umn.edu
Note: New users may be unfamiliar with SSH and so should be assisted in the test.
2. Access SPA OSG Cluster
In some instances in the past, CSE IT has not added the new user to the necessary computing groups to access the cluster.
This step merely consists of emailing csehelp@umn.edu again and re-asking for access to the cluster.
Test: You can SSH to a cluster node with your UMN credentials.
ssh <username>@spa-osg-login.spa.umn.edu
Note: If you are off campus, you will need to connect to the general-access node first, and then SSH again.
Alternative Test: You can log-in to one of the interactive desktops in the HEP-CMS offices.
3. Permissions on the SPA OSG Cluster
This is helpful for double checking that you have the correct access when connecting to the cluster.
Test 1: Make sure you can view the contents of our group's directory. Type the following into the shell and press enter after logging in.
ls /local/cms/user
You should see a listing of files in this directory. If you see Permission denied or similar,
then you should contact CSE IT.
Test 2: Make sure you can modify the contents of our group's directory. While still logged in to the cluster run the following command.
mkdir /local/cms/user/${USER}
This command will not printout anything if it was successful. If you see Permission denied,
then contact CSE IT. If you see File exists, then you (or someone else) already created this
directory and you should ask around the office for help if you don't remember doing it yourself.
Quality of Life Improvements
There are a few things you can do to make the SSH connection process easier. I encourage you to google around and read articles about SSH and how to configure it for your personal setup, but I have summarized some helpful and common information in the Misc section.
Cluster Architecture
As mentioned previously, the cluster is designed with simplicity in mind, keeping longevity as the highest priority. Since the cluster does not see many users (only ~dozen at any one time), we conciously chose to sacrifice some performance enhancements in order to maintain a certain level of simplicity in the cluster design.
Comments
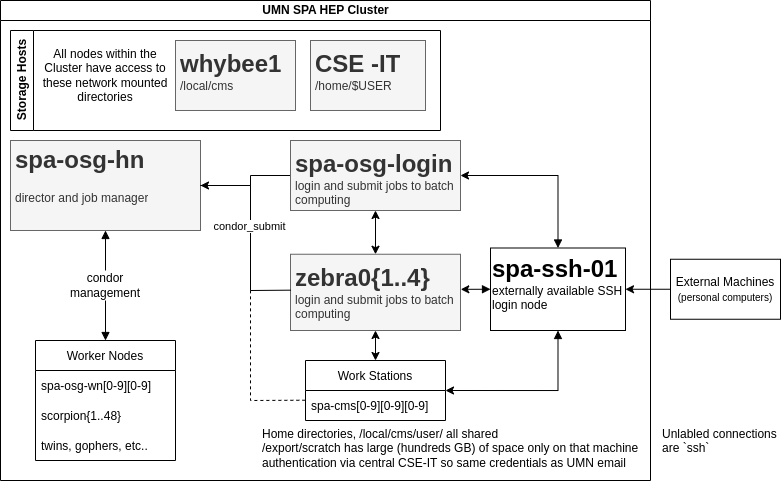
- OSG stands for Open Science Grid. We have designed the cluster in order to (in the future) connect to OSG and allow users of OSG to submit jobs from our cluster and write output files to our cluster. We do not currently have plans to enable running OSG jobs on our cluster unless absolutely necessary (discussions with representatives from OSG indicate that this is feasible).
- The head node (
spa-osg-hn) and the worker nodes are only accessible by CSE-IT admins and those of us added as "cluster admins" by IT. Currently, the cluster admins are Jeremy and Tom. - The login nodes (
spa-osg-loginandzebra0{1..4}) are intended to be the point from which condor jobs are submitted. Additional login nodes could be added if we have more users in the future demanding more interactive nodes. - The external ssh node (
spa-ssh-01) is actually just a simple redirect to a virtual machine which handles all the incoming traffic (cse-remote-spa-01). Many historic names for this node are included in the list of redirects (spartha,login.physics,ssh.physics). - Future plans for the cluster includes connecting the workstations to the condor cluster allowing them to submit jobs directly as well.
Important Nodes
Most nodes in the cluster are simply "worker" nodes (non-interactive computers for running batch jobs) or "workstation towers" (interactive desktop towers used directly), but there are a few nodes in the cluster that do critical tasks and cannot be simply recycled when they break down.
spa-osg-hn
This is the "head node". It does the managerial aspects of our workload manager condor as well as potentially other cluster-wide, background tasks. It needs to have many cores to easily run the O(5) daemons running these necessary administrative tasks.
spa-osg-login
This is the "login node". It is the central interactive node to which people ssh into in order to login to the cluster and submit batches of jobs to the cluster worker nodes. It needs to have a large number of cores and memory so that it can hold the O(dozen) users accessing it at any one time.
In order to distribute the load of users directly interacting with the cluster, there is an intention to introduce other interactive "login" nodes that have the same configuration as spa-osg-login but are simply different hardware.
whybee1
This is the "storage node". It hosts the NFS server which shares /local/cms/... across
the entire cluster. It needs to have a high quality and large bandwidth network connection
so users can access the network-attached storage as seamlessly as possible.
Specs (as of Aug 2, 2022):
- Dell R320 with iDRAC for remote access
- 48GB of Memory
- 4-core Xeon (on the low side, but NFS server has not been CPU-bound in the past)
- 2 80GB SSDs (raid 1) for TrueNAS OS
- 10GB Fiber Network
- LSI HBA Card for connected JBoDs holding disks
Important Locations
This page lists important locations (i.e. directories) that users of the cluster should be aware of.
Home Directories
Path: /home/<username> mostly abbreviated as ~
Type: NFS4
The home directories are provided by central CSE IT. This makes them shared across the entire CSE computing infrastructure (including other Linux login nodes on campus, not just within SPA). While you technically have the ability to request more storage capacity within them, the default quota limit is only ~1 GB.
Suggested Use: Keep configuration files (.bashrc, .vimrc, etc...) here only. Code and
data files should be kept elsewhere.
Shared Data Space
Path: /local/cms/user/<username> which is a friendlier alias to
/data/cmszfs1/user/<username>
Type: NFS4
The shared data space (often called "local") is a network attached filesystem with storage purchased by funding from our research group. This storage is shared among all users within UMN HEP experimentalist groups with a large majority of the users being from the UMN CMS groups. The directories are shared across the different nodes using NFS but on the storage node that hosts the data itself, they are stored within a ZFS file system. ZFS was chosen because it has some self-healing properties to help prevent bit-rot so it is a safer choice for storing large quantities of data.
The fact that this space is shared with all nodes in the cluster is both a positive and a negative. The positive is that you can use this area to share data between nodes (and between users) without the harsh limit of the home directories. The negative is that since the files are mounted over the network, they are less quickly read/written than if they were available on a disk attached to the machine you are on.
Suggested Use: Data Storage. Some folks also keep their code here, but you will see decreased performance compared to non-network disks.
Scratch Space
Path: /export/scratch/users/<username>
Type: ext4
As the name implies, the scratch space is intended to be used for scratch work. It is not shared between different nodes and so none of the files within it are backed-up to another location. Nevertheless, since the disk being used for the scratch space are physically attached to the node and are not mounted over the network, they are much more performant for reading and writing. This makes the scratch space ideal for code development as long as the code that is being developed is backed-up somewhere else (for example, GitHub or GitLab).
I spend most of my time in the scratch space of my workstation, only moving to the shared data space when I need to start using the multi-node nature of the cluster (i.e. submit jobs to condor).
Since each node has its own distinct scratch space, you will need to create a directory for your work.
mkdir -p /export/scratch/users/${USER}
These directories are only removed when the computer is re-installed with a new OS (only happens every few years), so you can keep returning to the same workstation and its scratch space for your work.
The scratch space is also used by condor as the "sandbox" directory that jobs are run within.
Suggested Use: Code development and test running.
Temp Directory
Path: /tmp
Type: ext4
Like the scratch space, this directory is designed to host temporary files that the computer needs to use. Unlike the scratch space, it is kept small O(10GB) and is not designed to be used directly. It should be left for system commands that require temporary files (e.g. ssh-agent).
Suggested Use: Dont use.
Root Directory
Path: /
Type: ext4
This is the space that hosts the operating system for the node. We try to keep it light so that the scratch space can have most of the disk that is attached to the node. It usually runs O(100GB) to give plenty of room for the system to generate the files it needs to function properly.
Suggested Use: Dont use.
Cluster Basics
This chapter is a short introduction for users who are unfamiliar with cluster computing or working from the terminal more broadly. If you are unfamiliar with either of those terms, this chapter should help you get started on your journey.
These topics are broad and used widely wherever computers are employed, so most of this chapter will be focused on short introductions and links to more substantial resources to learn more.
SSH
Heidelberg University has an excellent and detailed SSH Tutorial that goes through pretty much everything we need to understand in order to interact with our cluster.
Terminals
Ubuntu Tutorial for the Command Line
linuxcommand.org mostly takes the perspective that you are operating on your own computer with Linux installed; however, its information is also applicable to the interface you receive once you connect to the cluster via SSH.
Python3 Basics
- https://swcarpentry.github.io/python-novice-inflammation/
- http://swcarpentry.github.io/python-novice-gapminder/
Editors
Whenever using a remote computing cluster, the natural next question is how to edit the code files. There are a few options within our cluster and I've roughly separated them into groups based on how "close" the program is to the files that it is editing.
on Cluster
Almost as long as terminals have existed, terminal-based editors have existed as well allowing users to edit files from within a terminal (i.e. without having to spawn a different program or graphical window).
There are many terminal editors in existence all with their benefits and difficults; however, there are a few standard ones that exist on all1 Linux clusters that you will interact with.
The two major camps of terminal editors at the time of this writing are vim and emacs. Both have their quirks and learning curves; however, I would encourage you to learn the basics of at least one so that you are not "stuck" after connecting to a remote computer with a desire to edit a text file.
nano is also included and (as the name suggests) is focused
on being "bare-bones" so that it can be included on even the smallest systems. The reason
I mentioned it here is because it is the default editor used when running git commit
and so knowing its basics is helpful.
(Sidenote: you can defined the EDITOR environment variable to tell git and other
programs which text editor you prefer to use. For example, export EDITOR=vim in your
~/.bashrc file.)
Finally, I want to mention nvim. It is installed on the Rocky8 cluster nodes and is a rewrite of vim focused on modernizing the underlying plugin code. This has made it more user-friendly in some respects.
While I'm certain a hardworking person could find a specific Linux OS that does not have one or all of these editors, they are the de-facto standard and so are included on all the major Linux OS's.
on Cluster Workstations
The workstation desktops within the HEP-CMS offices have a Linux OS installed on them
are and maintained by CSE-IT. This allows them to be shared amongst us users and gives
them direct access to our shared data directory /local/cms.
While these workstations being a different OS than more common ones like MacOS and Windoze, they do offer a graphical user interface (GUI) that can be easier for many first time users compared to the terminal user interface (TUI) offered by SSH-ing to the cluster from a personal laptop or computer.
At the time of this writing, we are transitioning from CentOS7 to Rocky8 as the primary OS installed on these desktops, so the specific GUI editors installed may change. Just like TUI editors, there are many GUI editors and so I only list a subset of them here.
Containers and Their Runners
A simple description (although not perfectly accurate) of a container is a lightened virtual machine. A container is run using an engine (docker, singularity, and podman are popular options) which allows for the container to interact with the host operating system. Unlike a virtual machine, the container is only supposed to have the necessary libraries and binaries to do the task for which it is designed. This allows a container to be opened and closed quickly especially compared to a full virtual machine.
A container is run by reading a container image. An image is built also using a container engine and that is where the libraries and binaries are compiled and installed for the task.
Docker has a good page about what containers are.
On this cluster, we have singularity installed and standard users are able to run singularity images and build singularity images from pre-built layers available online. (singularity images cannot be built directly from a definition file since this requires security-weakening permissions.) A common workflow is to build a container image using docker on a personal laptop or on GitHub and push that image to DockerHub where it can be downloaded onto the cluster for parallel running.
While CVMFS can cover most of the dependencies required for the software we use, containers can cover the rest. Building your first container image and using a container for running can be very difficult; however, it is a very good way of standardizing how a specific application can be run.
A full description on how to write your first container image and use a container is out of the scope of this manual; however, below I have included links to example repositories and documentation that can help you get started.
Specific Notes
Here are specific comments about using containers on our cluster.
- singularity caches image layers downloaded from the internet by default in your home directory.
Your home directory is not large enough to cache these layers, so either download images using
the
--disable-cacheoption ofsingularity buildor move the layer cache by defining theSINGULARITY_CACHEDIRto be a location with more space (either/local/cmsor/export/scratch). - The executable singularity is installed on all the worker nodes, but your container image is an
input file. This means it should be included in input files that need to be transferred to the
worker node.
- Future: One improvement to the cluster would be to have a parallel network filesystem designed specifically to share images and other files that are only read at the start of jobs. This would decrease the transfer time without putting extra burden on the data storage space.
- For security reasons, standard users cannot build container images from a singularity definition file on the cluster nor can they unpack a singularity image into a "sandbox" image. You are restricted to only "building" container images by downloading them from DockerHub (or similar host) and running them.
Helpful Resources
- singularity documentation
- docker docs Get Started
- dark-brem-lib-gen : containerized MadGraph4 that works with either singularity or docker
- LDMX-Software/docker : containerized development environment for ldmx-sw
- Software containers for CMSSW: interacting with CMSSW from containers
Container Case Study: denv
This case study is focused on explaining how one can use denv on the cluster to simplify handling of dependencies you wish to use for different projects. One of the main issues I run into regularly is the fact that the system install of python is a very old version and I want to use python packages that require newer python versions.
This document assumes you've followed the instructions on the denv website on installing it.
denv is a very light (~21K) file that can be kept in your home directory so it is accessible
from everywhere on the cluster.
Just for comparison, there is a default installation of python available.
eichl008@spa-osg-login ~> python3
Python 3.6.8 (default, Jun 22 2023, 05:10:43)
[GCC 8.5.0 20210514 (Red Hat 8.5.0-18)] on linux
Type "help", "copyright", "credits" or "license" for more information.
>>> quit()
Basics
Let's jump to the newest python available by using denv.
eichl008@spa-osg-login ~> mkdir /export/scratch/users/${USER}
eichl008@spa-osg-login ~> cd /export/scratch/users/${USER}
eichl008@spa-osg-login ~> denv init python:3
# download output is omitted
eichl008@spa-osg-login /export/scratch/users/eichl008> denv python3
Python 3.12.0 (main, Nov 21 2023, 17:38:35) [GCC 12.2.0] on linux
Type "help", "copyright", "credits" or "license" for more information.
>>> quit()
Now that the python:3 image has been downloaded on the spa-osg-login node,
it will stay available unless the directory the denv is in is removed.
denv chooses to mount the workspace directory (where you ran denv init) as
the home directory within the container, so you can install python packages as
a normal user within the denv and they will be available upon future connections.
eichl008@spa-osg-login /export/scratch/users/eichl008> denv python3
Python 3.12.0 (main, Nov 21 2023, 17:38:35) [GCC 12.2.0] on linux
Type "help", "copyright", "credits" or "license" for more information.
>>> import numpy
Traceback (most recent call last):
  File "<stdin>", line 1, in <module>
ModuleNotFoundError: No module named 'numpy'
>>> quit()
eichl008@spa-osg-login /export/scratch/users/eichl008> denv python3 -m pip install --user numpy
# installation output is omitted
eichl008@spa-osg-login /export/scratch/users/eichl008> denv python3
Python 3.12.0 (main, Nov 21 2023, 17:38:35) [GCC 12.2.0] on linux
Type "help", "copyright", "credits" or "license" for more information.
>>> import numpy
>>> quit()
The final feature of denv that I should point out is that you can enter a shell if you don't provide a command
for it to run within the containerized environment. This is helpful if you need to do more complicated tasks that
require a series of commands.
eichl008@spa-osg-login /export/scratch/users/eichl008> denv
eichl008@eichl008:~$ python3 --version
Python 3.12.0
denv chooses to change the hostname to align with the workspace it is attached to which in this
case means it is the same as my username. One can change this name with the --name flag to denv init
(or use a more helpful directory name for the workspace).
Additional Mounts
denv can also add other mounts to be attached to the container when running. If I am using a denv to
read or write data within our group directory, I can mount it so that I don't have to perform an extra
copy outside of the denv.
# from within the denv workspace
denv mount /local/cms/user/${USER}
Condor Usage
HTCondor has a wonderful manual for both users and admins. For users, I would specifically highlight the Submitting a Job page, which goes into more explanation and offers more examples than I do here.
Common Workflows
From the perspective of condor the big difference between different batch running modes is whether or not the individual jobs are reading input data files during processing. All jobs will have to read files at the start of a job (i.e. to launch the software that is doing the work); nevertheless, the continual reading of a file during a job is what has the potential to lock-up our shared data space.
Just to have a short-hand, I am going to call "production" jobs ones that do not require reading of input data files during processing (e.g. generation of simulated data) and "analysis" jobs ones that do require reading of input data (e.g. reconstruction of data, calculating analysis variables, filling histograms). For the purposes of this cluster, "input data files" are ones stored here on our cluster. If your job is downloading data from some other cluster to run over, these jobs are effectively "production" jobs from our perspective. Condor has several helpful features that we can utilize to make submission of clusters of similar jobs easier.
Besides the existence of input data files, another separation between job types is the "foundation" of the software that is being run. Many CMS users utilize CVMFS to run CMSSW or related tools -- these will be called "cmssw" jobs even if they are not literally running CMSSW -- while other users run containerized applications via singularity -- these will be called "singularity" jobs.
In summary, we have four distinct job categories.
- Production via cmssw
- Production via singularity
- Analysis via cmssw
- Analysis via singularity
This document is focused on detailing how to accomplish each of the four job categories listed above. A vast majority of batch jobs already fall into one of the above categories and this cluster effectively assumes that all batch jobs will be in one of these categories.1
Generally, the difference between production and analysis jobs can be handled by using different queue commands (more explanation below), while the difference between cmssw and singularity running can be handled by using different executables that the jobs use during running.
Note In order to help meter the load on /local/cms/..., we give control of file transfering
over to condor. This allows the file transfer to be centrally maintained so that we can keep
it below configurable thresholds so users can still interact with /local/cms/... while jobs
are running.
This assumption is not formally required. Jobs not in one of these categories will not be prevented from running; nevertheless, the cluster is designed with these job-types in mind so jobs not conforming to them may be more difficult to configure properly.
Queue Commands
The queue command in a condor submit file has multiple different argument options, two are
of particular interest to us.
First (and more simply), we can use the basic integer argument for "production" style jobs.
This will allow define a unique integer $(Process) that we can use elsewhere in our submit
script to make sure the jobs produce unique simulated data (e.g. as a random seed number).
The command below would submit 200 jobs where the value of $(Process) would range from 0 to 199.
queue 200
Next, we can have condor create a job for each file matching a certain shell "glob" pattern.
The command below would submit a job for each .root file in the listed directory defining
the value of $(input_file) to be the file.
queue input_file matching files /full/path/to/directory/*.root
Finally, for more complicated situations, we can call a shell script to print out the argument
lines for the queue command. This is helpful for situations where we need more than one changing
argument per job (for example, some input files have a certain parameter while others have a different
parameter).
queue arg1, arg2, arg3 from list_args.sh |
The arguments argN are comma separated and simply taken from the lins printed by list_args.sh to
the terminal. This is also a helpful setup because you can run list_args.sh directly to see the
list of job arguments before submitting them.
Executables
Generally, the executable that condor actually runs for each job is a script (e.g. bash or python)
and not the main executable of our programs. This is because we usually need to set-up some sort
of specialized environment before running the program itself (e.g. by calling cmsenv inside of
the correct CMSSW distribution).
In order to be usable with Condor (which handles the file transfer), we have some requirements for these "run scripts" which I list here for future reference.
Requirements
- Able to be run in a non-interactive shell
- The input file(s) are in the current working directory.
- Condor copies them there before the script is started.
- The output file(s) are written to the current working directory.
- Condor copies all generated files in that directory after the script exits
Interactive "Job"
HTCondor doesn't really have a defined method for spawning an interactive job.
You may want an interactive job so that you can walk through executing your program manually
to debug what is going wrong. You can spawn an interactive job pretty easily by
having condor run a job that just sleeps indefinitely and then using condor_ssh_to_job to
connect to that job in its environment where you can start walking through your job script.
condor_submit interactive.sub
condor_ssh_to_job <job-number-from-above>
# make sure to remove idle job when you return
condor_rm <job-number-from-above>
interactive.sub
executable = /bin/bash
transfer_executable = no
arguments = "-c 'while true; do sleep 20; done'"
queue
Examples
The linked directories below are examples and are not usable out of the box. These are here just to help explain how to get set up with your own batch ecosystem.
Condor Configuration
- Move
EXECUTEto/export/scratch/condor/execute- More space for sandbox directories that jobs will run in
- Note Jobs wont operate with this change unless the EXECUTE directory
has the correct permissions (
755a.k.a.drwxr-xr-x) - the rest of the files condor reads/writes are kept in
/varwhich is large enough if we keep the root partition O(100GB)
- Separate roles
- head node is only the head node (condor:
use ROLE : CentralManager) - Login/submit node is only login/submit node (condor:
use ROLE : Submit) - worker nodes are only worker nodes (condor:
use ROLE : Execute)
- head node is only the head node (condor:
- Default allocation keeps 1 cpu per slot
- leave this as is since all of our multi-threaded apps are moved to other clusters like MSI
- Pretend the data storage space (
/local/cms/) is not mounted to worker nodes- allows condor to handle file transfer to scratch space
- centrally managed file transfer means the system can slow down jobs if the storage node is getting too many read calls (aka "throttling")
- Increase job throttling limit
FILE_TRANSFER_DISK_LOAD_THROTTLE = 5.0- Default
FILE_TRANSFER_DISK_LOAD_THROTTLEis2.0which is pretty conservative, we tried a value of10.0but that seemed to cause the submit node to lose connection with the NFS host so we settled on the moderate value of5.0.
- Default
- Set
JOB_START_DELAYto5- This makes sure no two jobs start within 5s of each other. This staggering is helpful to avoid overwhelming the shared data storage location.
- Maximum number of jobs kept in any single schedulers history is 10000
- This is the default set by HTCondor and means we should keep our clusters of jobs to less than 10k so we can inspect them via the history.
cmsRun within Condor
A few different scripts used to generate condor_submit and CMSSW configurations for
submitting CMSSW jobs to our condor cluster.
Example usage:
perl condor_filelist.perl \
  python/ConfFile_MyCmsConfif_cfg.py \
  datafiles/ListOfFiles.txt \
  {CMS run options} \
  --prodSpace /local/cms/user/{username}/jobName \
  --batch 10 \
  --jobname JobName
You must run cmsenv (in your desired CMSSW distribution!) before calling condor_filelist.perl.
condor_filelist.perl will then group the files in your input file list into batches based
on the batch size, and generate cfg files for each job in <prodSpace>/<jobName>/cfg.
Upon submission to condor, batch_cmsRun (which expects to be moved to ~/bin/batch_cmsRun)
will be called for each job to set up the environment and run cmssw.
This version is set up for running on the UMN cluster, and uses the built-in file transferring
utilities of condor to move the input files. In addition, each job generates a new executable
named after the job name which calls batch_cmsRun from within a slc7 cmssw singularity container.
batch_cmsRun
#!/bin/sh

SCRAM_ARCH=$1
RELSPACE=$2
WORKSPACE=$3
FILE=$4
STARTDIR=$(pwd)
echo ${STARTDIR}
if [ $# -gt "4" ]
then
    LOG=$5
else
    LOG=${FILE%%.cfg}.log
fi

if [ $# -gt "5" ]
then
    ELOG=$6
else
    ELOG=${FILE%%.cfg}.elog
fi

if [ $# -gt "6" ]
then
    /bin/rm -f $7
fi

CMSRUN_ARGUMENTS=""
for var in "${@:9}"
do
     CMSRUN_ARGUMENTS="${CMSRUN_ARGUMENTS} $var"
done

mkdir -p ${WORKSPACE}
cd ${WORKSPACE}
/bin/hostname
echo "INSIDE batch_cmsRun"
echo ${RELSPACE}
echo ${CMSRUN_ARGUMENTS}
pwd
# This version uses the locally installed versions of CMSSW
#source /local/cms/sw/cmsset_${SCRAM_ARCH}.sh >> ${LOG} 2>> ${ELOG}
# This version uses the remotely mounted drives at CERN
#echo "TESTING" >> ${LOG}
#set >> ${LOG}
cd ${RELSPACE}
#echo ======================== >> ${LOG}
#scram runtime -sh >> ${LOG} 2>>${ELOG}
#echo ======================== >> ${LOG}
eval 'cmsenv'
#echo ======================== >> ${LOG}
#set >> ${LOG}
cd ${STARTDIR}
cmsRun ${FILE} ${CMSRUN_ARGUMENTS}
condor_filelist.perl
#!/usr/bin/perl

use Getopt::Long;
use File::Basename;

#------------------------
#$prodSpace=$ENV{"HOME"}."/work";
$prodSpace="/data/whybee0b/user/".$ENV{"USER"};
$batch=10;
$startPoint=0;
$nosubmit='';
$use_xrootd=''; # '' is false in perl


$rt=$ENV{"LOCALRT"};
$arch=$ENV{"SCRAM_ARCH"};

$jobBase="default";

GetOptions(
    "batch=i" => \$batch,
    "start=i" => \$startPoint,
    "nosubmit" => \$nosubmit,
    "prodspace=s" => \$prodSpace,
    "jobname=s" => \$jobBase,
    "xrootd" => \$use_xrootd,
    "nice" => \$nice_user,
    "resubmit" => \$resub
);

$executable="$prodSpace/$jobBase/cfg/$jobBase";
print "$executable\n";
open(OUTP,">$executable");
print OUTP "#!/bin/sh\n";
print OUTP "source /local/cms/sw/cmsset_default.sh\n";
print OUTP "pwd\n";
print OUTP "hostname\n";
print OUTP "export SINGULARITY_BIND=\"/local/,/export/scratch/,/home/\"\n";
print OUTP "cmssw-cc7 --command-to-run ".$ENV{"HOME"}."/bin/batch_cmsRun \$@";
close(OUTP);
chmod 0755,$executable;
print "$#ARGV\n";
$nargs = $#ARGV;

$basecfg=shift @ARGV;
$filelist=shift @ARGV;
$cmsRunArguments=shift @ARGV;
for(my $i = 0; $i <= $nargs-3; $i++)
{
   $nextArg=shift @ARGV;
   $cmsRunArguments=$cmsRunArguments." ".$nextArg;
}
print "cmsRun Arguments: $cmsRunArguments\n";

if ($jobBase eq "default") {
    my $stub3=$basecfg;
    $stub3=~s|.*/||g;
    $stub3=~s|_cfg.py||;
    $stub3=~s|[.]py||;
    $jobBase=$stub3;
}

if (length($rt)<2) {
    print "You must run \"cmsenv\" in the right release area\n";
    print "before running this script!\n";
   exit(1);
}

if ($use_xrootd) {
    # Try to find the user's proxy file
    open(VOMSY,"voms-proxy-info|");
    while (<VOMSY>) {
        if (/path\s+:\s+(\S+)/) {
            $voms_proxy=$1;
        }
    }
    close(VOMSY);
}
#------------------------

print "Setting up a job based on $basecfg into $jobBase using $filelist\n";
if ($nosubmit) {
    print "  Will not actually submit this job\n";
}
if ($resub) {
	print " Resubmitting failed jobs\n";
} else {

$cfg=$basecfg;

system("mkdir -p $prodSpace/$jobBase");
mkdir("$prodSpace/$jobBase/cfg");
mkdir("$prodSpace/$jobBase/log");
}
$linearn=0;

srand(); # make sure rand is ready to go
if ($nosubmit) {
    open(SUBMIT,">condor_submit.txt");
} else {
    open(SUBMIT,"|condor_submit");
}
print(SUBMIT "Executable = $executable\n");
print(SUBMIT "Arguments = \"$cmsRunArguments\"\n");
print(SUBMIT "Universe = vanilla\n");
print(SUBMIT "initialdir = $prodSpace/$jobBase\n");
print(SUBMIT "Output = $prodSpace/$jobBase/log/output.\$(Process)\n");
print(SUBMIT "Error = $prodSpace/$jobBase/log/error.\$(Process)\n");
print(SUBMIT "request_memory = 1G\n");
print(SUBMIT "should_transfer_files = YES\n");
if ($use_xrootd) {
    # If the proxy file exists and is a normal file, we use it
    if (-f $voms_proxy) {
        print("Found voms proxy: $voms_proxy\n");
        print(SUBMIT "should_transfer_files = YES\n");
        print(SUBMIT "transfer_input_files = $voms_proxy\n");
        print(SUBMIT "X509UserProxy = $voms_proxy\n");
    }
    # Invalid file
    else {
        print("No voms proxy found! Please run `voms-proxy-init` and confirm that the file exists at /tmp/x509*\n");
        exit(1);
    }
}
if ($nice_user) {
    print(SUBMIT "nice_user = True\n");
}

open(FLIST,$filelist);
while (<FLIST>) {
    chomp;
    push @flist,$_;
}
close(FLIST);

$i=0;
$ii=$startPoint-1;

while ($i<=$#flist) {
    $ii++;

    @jobf=();
    for ($j=0; $j<$batch && $i<=$#flist; $j++) {
        if ($flist[$i]=~/file:/){
           $flist[$i]=~s|file:||;
        }
        push @jobf,$flist[$i];
        $i++;
    }
    if($resub)
    {
       $stub2=$jobBase;
       $stub2.=sprintf("_%03d",$ii);
       $fname=$stub2.".root";
       $jobCfg="$prodSpace/$jobBase/cfg/".$stub2."_cfg.py";
       unless(-e "$prodSpace/$jobBase/$fname") {print("Resubmitting $stub2\n")}
    } else {
       $jobCfg=specializeCfg($cfg,$ii,@jobf);
    }
    unless($resub and -e "$prodSpace/$jobBase/$fname")
    {
       $stub=$jobCfg;
       $stub=~s|.*/([^/]+)_cfg.py$|$1|;
       $log="$prodSpace/$jobBase/log/$stub.log";
       $elog="$prodSpace/$jobBase/log/$stub.err";
       $sleep=(($ii*2) % 60)+2;  # Never sleep more than a ~minute, but always sleep at least 2
       print(SUBMIT "Arguments = $arch $rt $prodSpace/$jobBase $jobCfg $log $elog $fname $sleep $cmsRunArguments\n");
       print(SUBMIT "transfer_input_files = ");
       for ($jobNum=0; $jobNum<=$#jobf-1; $jobNum++) {
       	print(SUBMIT "$jobf[$jobNum],");
       }
       print(SUBMIT "$jobf[$#jobf]\n");
       print(SUBMIT "Queue\n");
    }
}

close(SUBMIT);


sub specializeCfg($$@) {
    my ($inp, $index, @files)=@_;


    $stub2=$jobBase;
    $stub2.=sprintf("_%03d",$index);

    $mycfg="$prodSpace/$jobBase/cfg/".$stub2."_cfg.py";
    print "   $inp $index --> $stub2 ($mycfg) \n";
    #print "$inp $text\n";
    open(INP,$inp);
    open(OUTP,">$mycfg");
    $sector=0;
    $had2=0;
    $had3=0;
    while(<INP>) {
        if (/TFileService/) {
            $sector=2;
            $had2=1;
        }
        if (/PoolOutputModule/) {
            $sector=3;
            $had3=1;
        }
        if (/[.]Source/) {
            $sector=1;
        }
        if (/rivetAnalyzer[.]OutputFile/) {
            $sector=4;
        }
        # TFile Service Block
        if ($sector==2 && /^[^\#]*fileName\s*=/) {
            if ($had3==1) {
                $fname=$stub2."-hist.root";
            } else {
                $fname=$stub2.".root";
            }
            unlink($fname);
            print OUTP "       fileName = cms.string(\"$fname\"),\n";
            # PoolOutputModule Block
        } elsif ($sector==3 && /^[^\#]*fileName\s*=/) {
            if ($had2==1) {
                $fname="$prodSpace/$jobBase/".$stub2."-pool.root";
            } else {
                $fname=$stub2.".root";
            }
            unlink($fname);
            print OUTP "       fileName = cms.untracked.string(\"$fname\"),\n";
            # *Source Block (PoolSource, etc.)
        } elsif ($sector==4 && /^[^\#]*rivetAnalyzer[.]OutputFile\s*=/) {
                $fname="$prodSpace/$jobBase/".$stub2.".yoda";
            unlink($fname);
            print OUTP "process.rivetAnalyzer.OutputFile = cms.string(\"$fname\")\n";
            # PoolOutputModule Block
        } elsif ($sector==1 && /^[^\#]*fileNames\s*=/) {
            print OUTP "    fileNames=cms.untracked.vstring(\n";
            for ($qq=0; $qq<=$#files; $qq++) {
                $storefile=$files[$qq];
                if ($storefile=~/store/) {
                    if ($use_xrootd) {
                        $storefile=~s|.*/store|root://cmsxrootd.fnal.gov//store|;
                    } else {
                        $storefile=~s|.*/store|/store|;
                    }
                } else {
                    my($filename, $dirs, $suffix) = fileparse($storefile);
                    $storefile="file:".$filename;
                }

                print OUTP "         '".$storefile."'";
                print OUTP "," if ($qq!=$#files);
                print OUTP "\n";
            }
            print OUTP "     )\n";
        } else {
            print OUTP;
        }

        $depth++ if (/\{/ && $sector!=0);
        if (/\}/ && $sector!=0) {
            $depth--;
            $sector=0 if ($depth==0);
        }
#   printf("%d %d %s",$sector,$depth,$_);

    }
    close(OUTP);
    close(INP);
    return $mycfg;
}
container
In this example, we run a singularity container providing it with the command it should run inside of it corresponding to a specific LDMX workflow.
We use HTCondor's Python API to to the job submission and this python package provides some helper functions for watching and managing the jobs as well.
Setup
Install the our wrapper around the python API.
python3 -m pip install --user python/
Running
Besides the wrapper python package, an executable is also installed to ~/.local/bin which
(if this is in your PATH) you can launch from anywhere.
submit_jobs --help
to list all of the arguments it can receive.
Analysis with a ROOT Macro
Running a ROOT macro over a set of input parameters and files is a common analysis strategy within HEP.
Table of Contents
- run_script.sh : The actual executable run by condor. It sets up the environment and runs
root. - anamacro.C : The ROOT macro that is being run. It imports that analyzer defined elsewhere and then gives the parameters parsed from the command line.
- ana.sub : The condor sumbission file
- list-queue.sh : The script that parses job and sample listing files for the input parameters and prints the arguments one line per job
The job submission is separated out like this so that you can do a series of tests to make sure that things are operating as expected.
- Make sure
anamacro.Cruns through ROOT as you are developing your analyzer. - Make sure
run_script.shruns the same to make sure it sets up the correct environment - Run
list-queue.shto make sure that the jobs are being fed the correct parameters - Submit to the cluster
run_script.sh
#!/bin/bash

####################################################################################
# run ROOT macro
#
# INPUTS:
#   1 - comma-separated list of input file names (condor copies them to CWD)
#   2 - output file name (condor copies them out of CWD)
#   3 - xsec
#   4 - MC pileup file
####################################################################################

set -e

source /cvmfs/cms.cern.ch/cmsset_default.sh

echo -e "Running job on machine:"
hostname

cd /local/cms/user/wadud/aNTGCmet/CMSSW_10_6_24/src
eval `scramv1 runtime -sh`
cd -

# write the local file listing the input data files (one per line)
echo "$1" | tr , '\n' > $2.inputfiles.list

root -l -b -q "/local/cms/user/eichl008/umn-cluster/user-manual/condor/rootmacro/anamacro.C(\"$2.inputfiles.list\",\"$2\",$3,\"$4\")"
anamacro.C
#include "/local/cms/user/gsorrent/antgc_analysis/hltSF/UL17/hltScaleFactorNtuples.cc"

/**
 * Run like:
 *    root -b -l -q '/full/path/to/macro.C("input_file","output_file",xsec,"mcpu")'
 */
void anamacro(std::string input_file, std::string output_file,
                         double xsec, std::string mcpu){
	std::cout<<getCurrentTime()<<std::endl;
	std::cout<<"Begin root macro..."<<std::endl;

	hltScaleFactorNtuples(input_file, output_file, xsec, mcpu,
      "/local/cms/user/wadud/aNTGCmet/aNTGC_analysis/data/pileupUL17/pileup_2017_data.root");

	std::cout<<"End root macro!"<<std::endl;
	std::cout<<getCurrentTime()<<std::endl;
};
ana.sub
# we run inside of CMS's CentOS7 container
executable = /bin/bash

# CVMFS is distributed to all nodes so the executable itself
#   does not need to be copied
transfer_executable = no

# we want condor to copy any output files for us
should_transfer_files   = Yes

# have condor wait until the end to copy
#   you could also have this be ON_SUCCESS if you only want
#   output files when the run script returns 0
when_to_transfer_output = ON_EXIT

# the script to run our job within the CentOS7 container
#   this should be a full path and should be on /local/cms/...
#   so that it can be seen by all nodes
run_script = /local/cms/user/eichl008/umn-cluster/user-manual/condor/rootmacro/run_script.sh

# the input file for the job
#   notice we can use the variable that is defined in the `queue` command below
transfer_input_files = $(input_file)

# terminal and condor output log files
#   this is helpful for debugging purposes but you can delete these lines
#   for slightly better performance
output = $BASENAME(input_file).out
error  = $(output)
log    = $BASENAME(input_file).log

# "hold" the job if the script exits with a non-zero exit code
#   this is a helpful way to list which jobs failed
#   we also store the failure-status in the hold reason sub code so you
#   can see it using condor_q
on_exit_hold = ExitCode != 0
on_exit_hold_subcode = ExitCode
on_exit_hold_reason = "Program exited with non-zero error status (stored in HoldReasonSubCode)"

# we need to pass a specific environment variable to the condor job so
#   the directories we need are mounted to the container
environment = SINGULARITY_BIND=/home/,/local/cms/,/export/scratch/

# the command line arguments given to the executable
#   from condor's point of view, the executable is the container above,
#   so we need to pass the container commands first and then the run script we will run inside
#   I use the condor macro `BASENAME` here since condor will copy the input file to the working directory
#   the other arguments are also pulled from the variables defined by the `queue` command
arguments = "/cvmfs/cms.cern.ch/common/cmssw-cc7 --command-to-run $(run_script) $BASENAME(input_file) $(output_file) $(xsec) $(pileup_file)"

# submit a job for each line of arguments printed by the list-queue.sh bash script
#   the arguments are comma-separated, run ./list-queue.sh directly to see what
#   the output looks like without being consumed by condor
# the "initialdir" is used as the default directory for relative paths in a lot of condor_submit stuff
#   for us this is the relative path for output files so set this to the full path to the output directory
queue input_file, output_file, xsec, pileup_file, initialdir from ./list-queue.sh |
list-queue.sh
#!/bin/bash

# list job queue for analysis

outputDir=/local/cms/user/eichl008/umn-cluster/user-manual/condor/rootmacro/2out2put
sample_file=/local/cms/user/gsorrent/antgc_analysis/samples/aNTGC_Samples-ntuples_2017UL.csv
job_list=/local/cms/user/gsorrent/antgc_analysis/hltSF/UL17/batch/jobList.txt
splitfiles=1

readarray -t jobList < ${job_list}
{
  read
  while IFS=, read -r shortName dataset xSec xSecUnc singleJobFileList mcPUfile Nevents SumW SumW2 Neff lumi || [ -n "$shortName" ];
  do
    if [[ ! " ${jobList[@]} " =~ " ${shortName} " ]]; then
      continue
    fi

    jobBaseName=$(basename "${singleJobFileList}")
    jobBaseName="${jobBaseName%.*}"
    jobOutDir=${outputDir}/${jobBaseName}

    # create job directories
    [ -d "${jobOutDir}" ] || mkdir -p "${jobOutDir}"

    nFiles=$(sed -n '=' ${singleJobFileList} | wc -l)
    # make sure any data path left on HDFS is updated to its new location on LOCAL
    #   also write the input file list to a file for later reading
    sed "s|/hdfs/cms/user/wadud/anTGC|/local/cms/user/wadud/aNTGCmet|" ${singleJobFileList} > ${jobOutDir}/input_files.list

    i=0
    while read input_file; do
      i=$((i+1))
      # skip files that don't exist
      [ -f ${input_file} ] || continue
      # print row of inputs to run script
      echo "${input_file}, $(printf "%s_%05d.root" ${jobBaseName} ${i}), ${xSec}, ${mcPUfile}, ${jobOutDir}"
    done < ${jobOutDir}/input_files.list
  done
} < ${sample_file}

exit 0
Misc
This is a miscillaneous collection of notes about how to use the cluster we have designed here.
There is also a later section focusing on common issues that people run into when getting started using the cluster.
Common Issues
cmssw startup
When I try to start the container with
cmssw-cc7...I get the following error:
bash: /local/grid/cmssoft/cms/cmsset_default.sh: No such file or directory
The command cmssw-cc7 is simply a bash script that tries to recreate your current environment
within a CentOS7 container. This means it will re-source cmsset_default.sh from whichever directory
you originally sourced it. The symlink at /local/grid/cmssoft/cms/ simply points to /cvmfs/cms.cern.ch/`
however, this means it uses the wrong directory within the container and you see this error.
CVMFS Instability
For some reason, the CVMFS mount is failing to reinitialize after it enters some error states. This causes some machines to occasionally lose access to CVMFS. You can check if CVMFS is available by running the following command. If CVMFS is operational on that machine, you will see a long list of different software options provided by CVMFS.
ls /cvmfs/cms.cern.ch
ssh PubKey Auth
The cluster defaults to using password-based authentication tied together with Duo when attempting
to use ssh to connect to a machine. The Duo requirement is lifted when directly logging into a
computer (like a desktop workstation on campus); nevertheless, this security requirement can be
cumbersome for our workflows where we are sshing to and from machines frequently.
This is where SSH Public Key Authentication
comes in to save the day. The linked website goes through a very basic set up of SSH public key authentication.
After creating the SSH key, make sure to add it to your local ssh agent with ssh-add so that you are not
required to unlock the SSH key everytime you wish to use it.
An Extended Aside About SSH Key Passwords
SSH keys can be password-locked to prevent anyone who gains access to your computer from using the SSH key to pretend to be you. Password-locking is achieved by providing a non-empty password when generating the key. Locking the SSH key without any additional steps, then means you have to unlock it everytime you wish to use it. This still avoids the Duo step for us, but typing a password each time an SSH connection needs to be establish can become tedious. This tedium is not new and so SSH Agents were born. These allow you to unlock an SSH key once and they stay unlocked until the computer itself is turned off. This allows you to safely lock your SSH keys while also only having to type in a password once-in-a-while. SSH Agents are complicated and so I do not try to explain how to set them up here. My best advice is to search online for "SSH Agent your operating system" to find some advice from more knowledgeable people.
All this being said, you can avoid this rigamarole by creating a password-less SSH key. I am obligated to say that this is not recommended due to the security risk.
Add Aliases to SSH Config
Full Reference: man ssh_config
The file at ~/.ssh/config in Linux and MacOS (I have no idea where it is for Windoze) is helpful for shortening
what you need to type after the ssh program on the command line. At its most basic, you can shorten a specific
"host name" to be called something else on your computer.
# example section of a ~/.ssh/config
Host umn-cluster
  HostName spa-ssh-01.spa.umn.edu
Now, this allows me to type ssh umn-cluster which is the same as ssh spa-ssh-01.spa.umn.edu on my computer.
Basically, SSH looks through the config file for any Host matching what your typed on the command line.
It then applies the settings underneath that Host. This allows use to do fancier things like grouping together
servers that share the same settings. A more complicated example config is the one
I use.
User
This sets a default username for SSH to use for the host so you don't have to type it on the command line.
Host *.spa.umn.edu
  User <username>
LocalForward
This allows your computer to "share" a specific TCP port with the host. Most commonly, this is useful for running a JupyterLab instance on the cluster and viewing the resulting window on your computer after a connection with the proper port has been made.
Host zebra01
  User <username>
  HostName zebra01.spa.umn.edu
  LocalForward 8888 locahost:8888
ProxyJump
This tells SSH to connect to a specific server before continuing on to the next one. In our situation, it is helpful to avoid having to SSH twice when connecting from a non-UMN computer to the cluster.
Host zebra01
  User <username>
  HostName zebra01.spa.umn.edu
  ProxyJump spa-ssh-01.spa.umn.edu
which means I can simply do ssh zebra01. It is important to note that two authentications
are still made so without PubKey authentication, you would still need to type
your password and authenticate with Duo twice.
How to Use Jupyter
Jupyter is a frequently used platform to do data science and HEP is no exception. Using Jupyter on the cluster here can be done without too much hassle; however, if the amount of data you are analyzing is small enough to fit on your desktop/laptop, you will see better response performance if you simply copy the data there to analyze.
Start Up
First you need to install various python libraries that will allow you to run jupyter.
This should be done on the cluster where jupyter will be run. You will see improved performance of JupyterLab
if you install it into a python virtual environmenton /export/scratch.
This is because /export/scratch is not network mounted.
cd /export/scratch/users/
mkdir $USER
cd $USER
python3 -m venv pyvenv --prompt jlab
source pyvenv/bin/activate
pip install --upgrade pip
pip install --upgrade setuptools
pip install --upgrade jupyterlab
Next, on your desktop/laptop update the SSH configuration settings to connect the port on the cluster that jupyter will talk to to the same port on your laptop.
# inside of ~/.ssh/config on your desktop/laptop
Host <shortname> :
  User <umn-username>
  HostName <full-computer-name>.spa.umn.edu
  LocalForward 1234 localhost:1234
Finally, go to the cluster and launch jupyter to the same port that you put into your SSH configuration.
ssh <shortname>
cd <working directory>
# if you installed it to /export/scratch you need to re-enter the python virtual environment
source /export/scratch/users/$USER/pyvenv/bin/activate
jupyter lab --no-browser --port 1234
This last command will print out a few links which you can click on and open in the browser on your desktop/laptop.
Comments
- Ports are shared between all users on a given computer, so the specific port you choose may be used by another person. In this case, jupyter will add one to the port number until an available port is found. This will cause you to not be able to connect to the jupyter session anymore since your SSH configuration points to one port while jupyter points to a different one. You can resolve this by either changing nodes or updating yoru SSH configuration.
- Jupyter runs from within a working directory and makes a lot of I/O operations in order to save progress and render
images. This means running jupyter from a network-attached filesystem will be noticeably slow. It is suggested to
put your jupyter notebooks into
/export/scratch/...and back them up to GitHub similar to other code.
Newer Python
There are two methods available on the cluster for obtaining a different version of Python compared to the version installed at the system level. Either may fit your use case.
Since Jupyter is running on the cluster, the other steps from the start-up section above are not changed. The only steps that are changed are how jupyter is installed and how it is run.
CVMFS
The cluster has access to CVMFS which is a way to distribute pre-built software
that was developed at CERN for the large experiments like CMS.
This is a helpful method because it contains a variety of pre-built Python versions while also allowing you
to have access to the system libraries that do not interfere with this pre-built Python version.
One example is LaTeX: one could use this method to enable plotting using a newer version of matplotlib
(or some other Python package) while also allowing for matplotlib to access the system installation
of latex for constructing any equation-based labels.
The major downside of this method is that it is often difficult to find what Python verisons are
available and how to activate them - below is just an example to help guide you and may not work
out of the box.
# setup Python 3.9.14 from CVMFS
. /cvmfs/cms.cern.ch/el8_amd64_gcc12/external/python3/3.9.14-4612d00f9f0430a19291545f1e47b4a4/etc/profile.d/init.sh
# initialize a python venv with this python version
python3 -m venv venv
# make sure the original init is always source when the venv is activated
# the follow prepends the source command above into the venv activation file
sed -i.bak \
  '1s|^|. /cvmfs/cms.cern.ch/el8_amd64_gcc12/external/python3/3.9.14-4612d00f9f0430a19291545f1e47b4a4/etc/profile.d/init.sh\n|' \
  venv/bin/activate
Then you can install jupyterlab (along with any other python packages you want) after activating the venv.
. venv/bin/activate
pip install jupyterlab # and anything else
and run it only after activating the venv.
. venv/bin/activate
jupyter lab --no-browser --port 1234
Containers
We can use containers in order to aquire a newer python version that isn't currently available on the cluster. The example below uses denv similar to the case study which focused more on using command line tools.
The benefit of using containers is that they provide a truly isolated environment and, specifically for Python,
an image is built for each Python release so you can pick whatever Python release you wish.
No packages from the system clutter the environment which is nice for reproducibility;
however, it may mean you "lose" access to certain packages from the host system (like latex in the example above).
Rather than using a virtual environment in /export/scratch, we can create a denv within /export/scratch
referencing the newest python version available. Note: before using denv (or any containers), make
sure to move the caching directory to a larger directory than your home (e.g. with export APPTAINER_CACHEDIR=/export/scratch/users/${USER}).
cd /export/scratch/users/${USER}
denv init python:3 # or whatever version you want https://hub.docker.com/_/python/tags
denv python3 -m pip install --user --upgrade jupyterlab
Then, whenever you wish to launch jupyter lab you just need to prefix the program with denv.
cd /export/scratch/users/${USER}
denv jupyter lab --port 1234
tmux and It's Extension smux
tmux is short for Terminal MUltipleXer and, conceptually, lets you "split" one terminal into many different terminals.
It is a very powerful program with a lot of different features, below I have simply listed two resources I've found
helpful.
- tmux Cheat Sheet for remembering how to do certain things
- tmux Wiki on GitHub is helpful for learnign the vocabulary and how to use it
One of the features that tmux offers is the ability to "detach" from a terminal session and allow the program to continue running
in the background. This is very helpful when connected with ssh, allowing us to go to the cluster, start a program that takes
a long time to run, detach from that terminal, disconnect from ssh, and only reconnect when we want to check on our long-running
program. This ssh+tmux workflow is so common for me that I wrote a small bash wrapper connecting the two called smux.
Below, I have copied the bash code which I've been using for a few years now. Feel free to put it in your .bashrc or some other
file for later use. I've also isolated it into a POSIX-compliant shell executable on Codeberg
which is light enough to install into your home directory pretty much anywhere.
curl -s https://codeberg.org/tomeichlersmith/smux/raw/branch/main/install | sh
smux
#!/bin/bash

# ssh+tmux = smux

__smux_help() {
  cat <<\HELP

  Using ssh and tmux on remote computers.

  NOTE: <TAB> completion for smux only works after it is attempted for ssh.

 USAGE:
  smux [-h|--help] [-l|--list] <host> [session]

 OPTIONS:
  -h|--help : print this help and exit
  -l|--list : list the sessions on the input host and exit

 ARGUMENTS:
  host      : (required) hostname of computer you wish to attach to
  session   : (optional) name of session to attach to on the input host

HELP
}
__smux_list() {
  local _host="$1" #required
  ssh -t ${_host} "tmux ls 2> /dev/null"
  return $?
}
__smux_attach() {
  local _host="$1" #required
  local _session="$2" #optional
  ssh -t ${_host} "tmux attach ${_session:+-t} ${_session} || tmux new ${_session:+-s} ${_session}"
  return $?
}
smux() {
  case "$1" in
    ""|-h|--help)
      __smux_help
      return 0
      ;;
    -l|--list)
      __smux_list "$2"
      return 0
      ;;
    -*)
      echo "ERR: Unknown option $1"
      return 1
      ;;
  esac

  __smux_attach "$1" "$2"
  return $?
}

__complete_smux() {
  if ! hash _ssh &> /dev/null; then
    # __load_completion is a bash internal that is used
    #   to expand the tab completion set of functions if
    #   no function is defined
    #   it defines the ssh completion function _ssh
    __load_completion ssh || return $?
  fi

  # disable readline filename completion
  compopt +o default

  local __curr_word="${COMP_WORDS[$COMP_CWORD]}"

  if [[ "$COMP_CWORD" == "1" ]]; then
    if [[ "${__curr_word}" == -* ]]; then
      # option
      COMPREPLY=($(compgen -W "-h --help -l --list" -- "${__curr_word}"))
    else
      # host, use ssh tab completion
      _ssh
      return $?
    fi
  else
    case "${COMP_WORDS[1]}" in
      -l|--list)
        # shift inputs so _ssh tab complete works
        COMP_WORDS=(${COMP_WORDS[@]:1})
        COMP_CWORD=$((COMP_CWORD - 1))
        _ssh
        return $?
        ;;
      *)
        # no other tab complete implemented,
        #   we /could/ try tab completing tmux sessions on the host
        #   that is already selected, but that would make tab complete
        #   slow since it would have to ssh there to find out the list
        COMPREPLY=()
        ;;
    esac
  fi
}
complete -F __complete_smux smux
Cluster Admin Manual
The word "manual" is probably a misnomer, this area is simply a collection of studies that were done and notes that were taken during the construction of the updated cluster.
Table of Contents
- filesystem is a study on how HDFS compares to copying to scratch from LOCAL done on the old cluster
- hardware is a survey of the hardware of the nodes in the cluster
- proto-cluster is a series of job-timing studies on the new cluster
- hardware.md are notes on how the current hardware interacts with updated software
cmsfarm_slack.pyis a (currently not working) script to post the status of the cluster to a channel in slackrestart_cvmfs.yamlis an Ansible script to restart CVMFS
Helpful Tips
zfs snapshots
ZFS takes "snapshots" of the data-on-disk periodically in order to prevent unintentional dataloss. The size of these snapshots roughly scale with the size of any changes in data-on-disk, so large snapshots will clutter the disks if we remove a lot of data at once. CSE-IT can manually remove ZFS snapshots if we ask them to.
It is important to keep these snapshots in mind when inspecting the available space on /local/.
ZFS does not include these snapshots in the total size of the filesystem since (for most situations)
are negligible. Generally, you can think of the following equation.
Total Raw Disk Space = (ZFS Snapshot Size) + (Size reported from df)
This means you will want to ask CSE IT to manually drop snapshots if you intentionally delete a large amount of data.
These snapshots are not meant as a form of backup. They are only useful for restoring the entire filesystem to a previous state.
singularity details
The container runner we have installed on the cluster is called apptainer and is a fork of singularity;
therefore, it can be accessed under the program name singularity as well.
For extra confusion, there is another fork of singularity maintained by SyLabs called SingularityCE
(CE for Community Edition) which has not been renamed.
sudo access
A select few members of the research group are given "intermediate" sudo access by the IT administrators.
If you wish to be apart of this group, you should contact IT (specifically Chad).
If you are apart of this group, you can list the commands you have sudo access to with sudo -l.
Disk Usage Report
Need to itemize the space used by folks? Go to that directory and use du -sh. Pipe the output to a file for persistency.
For example:
eichl008@spa-cms017 /local/cms/user> du -sh * | tee /export/scratch/users/eichl008/local_usage.txt
Disk Access Report
This is helpful for seeing how long its been since folks have accessed a particular set of files.
Maybe if it has been a long time we can remove those files in order to make space for future files.
stat -c %X <file> gives the time of last access in seconds since the Unix epoch, we can use this
in conjuction with find (or its parallelized sibling fd) to
find the file that was last accessed within a certain directory. awk can do some simple programming
(like finding a maximum value) and can format the epoch time into human readable.
fd -tf -x stat -c '%X' | awk 'BEGIN {t=0} {if ($1 > t) t = $1 fi} END {print strftime("%c",t)}'
I can use this behemoth to assign a "last accessed" time stamp to a specific directory. For example, I've done this for getting "last accessed" time stamps for various user directories.
eichl008@spa-cms017 /local/cms/user> for d in *; do
> [ -d $d ] || continue
> last_access=$(cd $d && fd -tf -x stat -c '%X' | awk 'BEGIN {t=0} {if ($1 > t) t = $1 fi} END {print strftime("%c",t)}')
> echo "$d ${last_access}"
> done | tee /export/scratch/users/eichl008/local_access.txt
agedu
agedu is a helpful tool that indexes all data-on-disk according to size and age. This is very useful for our use case. It operates by scanning an input directory, generating a data file storing this index and then opens a rudimentary web page for exploring the data.
It is not available already installed on our systems, but it is relatively easy to build.
Build and run agedu from /export/scratch to avoid having it's data file clutter /local/.
git clone https://git.tartarus.org/simon/agedu.git
cd agedu
cmake -B build -S . -DCMAKE_C_STANDARD=99
cd build
make
Scanning a directory looks like the following. This is the command that will take a long time to run since it has to go through all files in the provided directory.
./agedu/build/agedu --scan /local/cms/user/
There are many options for tuning the scan. Look at the online manual or the --help option for details.
After the scan is done, you can open up a local, simple web page for exploring the data.
./agedu/build/agedu --web
CVMFS
CVMFS works well most of the time, but we do see a lot of instability on various machines. I am simply collecting notes here for trying to understand what is going on.
CVMFS Reboot
If /cvmfs/cms.cern.ch is not present but /cvmfs/cvmfs-config.cern.ch is, then something went wrong.
The following does a hard reboot of CVMFS which has fixed the problem.
sudo service autofs restart && sudo cvmfs_config wipecache
Investigation into why this problem arises is still ongoing.
Static Mount
Due to investigation studying CVMFS Instability,
we switched to static-mounting CVMFS repositories within /etc/fstab rather than using autofs.
This was done to avoid the periodic CVMFS dropping we were observing and was feasible since our
group only uses a handful (~5) of set CVMFS repositories.
EL9 kernels have a patch to autofs that should resolve this dropping issue, so once we update the cluster operating system we can possibly switch back to autofs.
Filesystem Benchmarking
In order to inform our filesystem storage decision, we should benchmark our specific use case.
Specifically, I am interested in comparing reading access between ZFS and HDFS both of which are installed at scale currently. We expect reading access to be more important because we do not have the cores necessary to perform large scale data generation runs; therefore, we expect only moderate data generation runs or generation done at another cluster with the results copied here for analysis.
Situation
We have hundreds if not thousands of files that we are reading. Most often, only one job will be reading individual files because the whole analysis run is meant to iterate over all of the files. I forsee two different methods for reading a file within a single job.
- Read directly from the file stored on a remote mount
- Copy the file to local scratch space before processing
Both of these reading methods also could be used on both of the different FS options, so we have four test cases.
- Read direct on ZFS - so slow upon early tests, we will not always include this case in more refined testing
- Copy from ZFS and then read local
- Read direct on HDFS
- Copy from HDFS and then read local
Running
In this directory, there is a ROOT macro analysim.C and a job description file benchmark.sub. We assume that we have access to CVMFS and my personal install of ROOT in my directory in /local/cms/user.
The output of the condor jobs expect the directory output to already exist.
The submission file has a few command line parameters allowing the user to decide which case to test. These parameters are provided in between the condor_submit command and the description file.
For example, in order to test reading all of the branches from the files on hdfs:
condor_submit benchmark.sub
A more realistic test is to only read a subset of these branches, you can limit the number of branches read to at most N branches using another command line parameter.
condor_submit max_branches=N benchmark.sub
The other paramters are in the table below.
| Parameter | Description |
|---|---|
zfs | If defined, use data in local rather than hdfs. |
cp_to_scratch | If defined, copy data file to scratch before processing |
no_proc | If defined, don't process data file during job at all |
max_branches | Defined to maximum number of branches to process |
Batch of Clusters
Running the following will get a survey of the 4 different situations given that you want to be reading N branches.
The priority argument is one provided by HTCondor allowing us to order the jobs in the intended sequence.
After trying to run with this design, we still observed some overlapping between the different "clusters" of jobs,
so we will not use priority and instead run clusters of jobs separately manually.
With 818 jobs and a 5s start delay between them, the clusters will have a minimum run time of 68 minutes.
condor_submit max_branches=N benchmark.sub # hdfs remote
condor_submit max_branches=N cp_to_scratch=yes benchmark.sub # hdfs to scratch
condor_submit max_branches=N zfs=yes benchmark.sub # zfs via nfs remote, very intensive on /local/, may omit
condor_submit max_branches=N zfs=yes cp_to_scratch=yes benchmark.sub # zfs via nfs to scratch
Additional situations to include.
condor_submit zfs=yes cp_to_scratch=yes no_proc=yes benchmark.sub # just do the copy to scratch
We've settled into two values of max_branches, -1 to test the maximum analysis where all branches are necessary
and 50 to test an average analysis were a large subset is required.
This means to rerun all of the benchmark tests, you need to submit the following 7 clusters of jobs.
Make sure one "cluster" completes before you submit the next "cluster".
condor_submit max_branches=-1 benchmark.sub # hdfs remote
condor_submit max_branches=-1 cp_to_scratch=yes benchmark.sub # hdfs to scratch
condor_submit max_branches=-1 zfs=yes cp_to_scratch=yes benchmark.sub # zfs via nfs to scratch
condor_submit max_branches=50 benchmark.sub # hdfs remote
condor_submit max_branches=50 cp_to_scratch=yes benchmark.sub # hdfs to scratch
condor_submit max_branches=50 zfs=yes cp_to_scratch=yes benchmark.sub # zfs via nfs to scratch
condor_submit zfs=yes cp_to_scratch=yes no_proc=yes benchmark.sub # just do the copy to scratch
Converting ROOT macro output to CSV
The ROOT macro analysim.C prints out the resulting CSV row at the end of processing. It is the only line (errors or no errors) that begins with a numeric digi, so we can
grep -ohr '^[0-9].*' output/ >> data.csv
-o prints only matching pattern, -h suppresses the file name, and -r recursively goes through directories provided.
Copying to /dev/null
In addition, we can check the load on the ZFS disks without interference from the variable disks holding the scratch space
by copying the file to /dev/null.
condor_submit cp_dev_null.sub
The output of these jobs is different from benchmark.sub and requires a bit more manipulation.
find output/ -type f -exec head -n 1 {} ';' | cut -d ' ' -f 2 | sed 's/system/,<delay-time>/' >> cp_dev_null.csv
where <delay-time> is the value of the next_job_start_delay parameter in cp_dev_null.sub.
Important Note
A big parameter is the next_job_start_delay parameter.
This allows us to space out the start time of the jobs so that the servers we are reading from aren't all hammered at once.
For these tests, I have set this parameter to 5 (seconds) which means the jobs take longer to get going but it keeps the load on the servers hosting the files low.
The HTCondor documentation points out that this parameter can be completely avoid through more specific tuning of condor_schedd.
This command is no longer useful, as throttling should be accomplished through configuration of the condor_schedd daemon.
The Admin Manual provides two configuration parameters allowing for us to apply a blanket job-start-throttling policy for all cluster users.
JOB_START_COUNTThis macro works together with theJOB_START_DELAYmacro to throttle job starts. The default and minimum values for this integer configuration variable are both 1.
JOB_START_DELAYThis integer-valued macro works together with theJOB_START_COUNTmacro to throttle job starts. Thecondor_schedddaemon starts$(JOB_START_COUNT)jobs at a time, then delays for$(JOB_START_DELAY)seconds before starting the next set of jobs. This delay prevents a sudden, large load on resources required by the jobs during their start up phase. The resulting job start rate averages as fast as($(JOB_START_COUNT)/$(JOB_START_DELAY))jobs/second. This setting is defined in terms of seconds and defaults to 0, which means jobs will be started as fast as possible. If you wish to throttle the rate of specific types of jobs, you can use the job attributeNextJobStartDelay.
TODO: Run some jobs without this parameter to confirm this hypothesis that the load will see a dramatic spike without the spacing.
Server Load
While the jobs are running, we also want to gather data on the nodes hosting the filesystem involved.
For ZFS, this is simply whybee1 while for HDFS these are the "name nodes" hdfs-nn1 and hdfs-nn2. gc1-se is the "storage element" which may be needed as well.
In order to collect load information during the job, it is important to start logging before the jobs are submitted so that we can get a "baseline". During the HDFS runs that read all the branches from the input files, Chad ran the sar command on hdfs-nn1 and we saw CPU usage stay > 98% idle for a vast majority of the run (full sar log sampling every 20s in file hdfs-nn1-sar.log).
To help parse the logs, the table below lists the runs that were submitted in clusters and the time they were submitted.
| Run | Submission Time | Last Job Completed |
|---|---|---|
| HDFS All Branches Remote | 2/18 13:35 | 2/18 17:11 |
| HDFS All Branches cp to scratch | 2/19 09:32 | 2/19 12:21 |
| ZFS All Branches Remote | 2/25 10:12 | 2/25 13:57 |
| ZFS All Branches cp to scratch | NA | NA |
Note: The logs were generated using a python script reading the ROOT files via the python bindings.
This was expected to be slow, so I am repeating the jobs with the ROOT macro.
Local testing does show a pretty good speed improvement when using a ROOT macro (or similar speed improvement
when using SetBranchStatus instead of constructing/deleting Python objects on each loop).
Rocky Linux Current is now at 8.6
Updated Foreman's Repository to force 8.5 for now. Need to add new OS RockyLinux 8.6 to Foreman in the future and use 8.6 driver for Mellonox Fiber Card https://linux.cc.iitk.ac.in/mirror/centos/elrepo/elrepo/el8/x86_64/RPMS/kmod-mlx4-4.0-7.el8_6.elrepo.x86_64.iso
C6100 - 4-node chassis
mellonox fiber network not supported
Create USB drive with OEMDRV label. Drop https://linux.cc.iitk.ac.in/mirror/centos/elrepo/elrepo/el8/x86_64/RPMS/kmod-mlx4-4.0-6.el8_5.elrepo.x86_64.rpm onto Drive. inst.dd option loads driver from kickstart installer
test inst.dd=https://linux.cc.iitk.ac.in/mirror/centos/elrepo/elrepo/el8/x86_64/RPMS/kmod-mlx4-4.0-7.el8_6.elrepo.x86_64.iso now that Rocky 8.5 install is fixed
spa-osg-hn.spa.umn.edu OS installation inprogress
R410
Right now, there are two pxelinux templates for RockyLinux. One for R410 and one for C6100. To install one must modify the OS to use a specific pxelinux template. This could break the vmlinuz and initrd.img entries on foreman-tftp-01:/var/lib/tftpboot/boot
Hardware Survey
This is simple, we just ssh to all of the nodes on the cluster and retrieve their hardware specifications.
UMN HEP Computing Cluster
Partially administrated and maintained by HEP students.
Stack
- OS✔️
- Rocky Linux
- Needs driver support for hard disk controllers used in R410 computers
- Chad discovered that RedHat 8.5 variants do not have these drivers and require a hacky workaround
- A workaround has been found by loading the driver on boot
- Auth✔️
- VAS and AD using IDs from central IT
- Filesystem and storage
- ZFS for data storage
- HDFS data evacuated to expanded ZFS+NFS area
- Once decomissioned, allows us to set a minimum of O(2TB) for boot disks
- No reason to go lower than O(500GB)
- Home directories provided by CSE-IT
- ? Higher performance scratch disks ?
- Separate partition/mount for system caches so that users don't prevent CVMFS/related from using necessary cache area
- (money alert) upgrade dozen(ish) scorpions with scratch space < 10GB
- at minimum, harvest HDFS disks so that scratch areas can be larger
- Admin Config Manager✔️
- Squid caching to help limit external network access to only what is necessary ✔️
- This is required for CMSSW (I think) and is helpful for CVMFS
- We can also look into connecting this caching to the container runner and its storage of container images
- Workload Manager✔️
- HTCondor
- Reconfigure with central job throttling
- Define working nodes to make it easier for users to use the highest number of cores possible
- CVMFS ✔️
- CERN-related jobs, some containers are even distributed via CVMFS
- can we attach our own material to CVMFS?
- Container Runner ✔️
- singularity easy to install
Delayed
These goals are not necessarily "removed", but will not be primary goals.
- OSG Storage Entrypoint
- Depends on xrootd
- Allows jobs out in OSG to read/write files here
- Setting up certificates so folks can submit crab jobs from this cluster
- Connect to LDCS?
- ARC Client Tools
- Ask Florido (ARC dev and Lund sysadmin) for advice on setup
- Globus ✔️
- Extremely useful in rare situations
- Make sure our storage node is available to it
- UMN has expanded its license so we are probably good
- ID tied to internet ID
Assembly
All nodes have the Stack detailed above.
Head Node
- Combined duties to simplify design of cluster
- Runs the Condor Scheduler + other "god" activities
Login/Submit Node
- ssh to it to submit jobs
- Condor client with submit privileges
- Allow login by users
Worker Nodes
- condor client to receive jobs
- not allow un-privileged users to ssh directly to
- ? allow specific non-sudo users to connect to help debug ?
Nodes Already Provided
- Globus
- May need to move it to Keller off of old v-sphere host
- Squid Proxy
- Already in Keller
Other considerations:
- 21 6TB hard driveshave been added to whybee1's ZFS pool.
- 6 additional 6TB drives pulled from Hadoop. Need ~10 to add more to Whybee1's second jbod. Hot spares are also very good to have.
- 2nd jbod has around 24 open slots for expansion
proto-cluster
Testing different configurations and nodes on the cluster.
Table of Contents
job_timing_study.ipynb: Plots comparing the transfer time to the executing time of different jobscwd.sub: Print the current working directory (make sureEXECUTEgot moved to/export/scratch/..)- uses
print-details.sh
- uses
touch.sub: Touch a file as the job (make sure job timing stagger is functioning)multicore.sub: See what happens when a job requests multiple coressleep.sub: Submit a simple set of sleep jobs- wadud : re-running Mohammad's analysis on the new cluster
- logs : logging of what I did while playing with a clean Rocky Linux install
Install Developer Tools
sudo dnf upgrade --refresh -y
sudo dnf install git
Output in git-install.log
sudo dnf install tmux
Output in tmux-install.log
Install singularity
Following this guide.
Install Package Manager Dependencies
sudo dnf install -y \
  openssl-devel \
  libuuid-devel \
  libseccomp-devel \
  wget \
  squashfs-tools \
  cryptsetup
Output in singularity-dependencies-install.log
Found out later I also need a C compiler.
sudo dnf install -y gcc
Output in gcc-install.log
Found out later I also needed make
sudo dnf install -y make
Install Go
Just unpacking the latest version from go.dev/install.
wget https://go.dev/dl/go1.18.2.linux-amd64.tar.gz
sudo tar -C /usr/local/ -xzvf go1.18.2.linux-amd64.tar.gz
rm go1.18.2.linux-amd64.tar.gz
Outputs in wget-go.log and unpack-go.log
Need to add the go install to the environment as well.
echo 'export PATH=${PATH}:/usr/local/go/bin' | sudo tee /etc/profile.d/go.sh
Open new terminal to make sure this is in our environment.
Install singularity
Chose the git method for downloading the source so I can go back to a previous version if need be.
git clone git@github.com:sylabs/singularity # GitHub forces ssh key now
cd singularity
git checkout v3.9.9 # found latest using git tag
./mconfig | tee ../umn-server/proto-cluster/logs/mconfig-output.log
make -C builddir/ | tee ../umn-server/proto-cluster/logs/make-output.log
sudo make -C builddir/ install | tee ../umn-server/proto-cluster/logs/make-install-output.log
Install xrootd
Need cmake
sudo yum install cmake
output in cmake-install.log
Need g++
sudo yum install g++
output in g++-install.log
Configure build
git clone --recursive git@github.com:xrootd/xrootd.git
cd xrootd
cmake -B build -S .
cmake output in configure-xrootd.log
Build and Install
cd build
make
sudo make install
make output in make-xrootd.log and install output in make-install-xrootd.log
Include xrootd install in linker path
echo /usr/local/lib | sudo tee -a /etc/ld.so.conf
echo /usr/local/lib64 | sudo tee -a /etc/ld.so.conf
sudo ldconfig
Compare Actual Analysis
We want to look at how the performance changes when running analyses on the new cluster with the copy-to-scratch compared to the old cluster reading directly from HDFS. We are expecting jobs to take longer since they have an extra task, but we would like to quantify the difference.
The file condor_history_wadud_scorpion1.log lists the job IDs, their submission, start, and end times for all of Mohammad's jobs
submitted from scorpion1 that were still kept in the condor spool as of July 20, 2022. We can extract batches of jobs from the
submission times and then study how long they took to run as well as how long the entire campaign ran.
Usage Notes
I've pulled out the stuff from Mohammad's submission script so that I can give more control to Condor for later file copying. The basic usage is
# choose a job list
ln -sf <job-list.txt> jobList.txt
# write submission file and create working directories
cp ana.sub ana-<name>.sub
./list-queue.sh >> ana-<name>.sub
# submit to condor
condor_submit ana-<name>.sub
July 13, 2022 Meeting with Mohammad
Learn how someone does an actual CMS analysis so I can replicate it in this test.
-
NTuples on HDFS are simulations of various processes related to analysis (including some data)
-
NTuples consist of lots of vector
for various physics objects on event-by-event basis -
Usually only looking at a subset of these events matching certain quality criteria
-
store objects of interest after selection in new set of smaller ntuples for later plotting
-
with HDFS the skimming takes ~3 hours for whole group of jobs to finish (<30min per file)
-
about 4k jobs to skim all of run 3
Mohammad runs the following script which relies on some other files in the same directory.
/data/cmszfs1/user/wadud/aNTGCmet/aNTGC_analysis/Systematics/batch/csub.sh